ESSENTIAL OIL DISTILLER OPERATING INSTRUCTIONS
Directions
IMPORTANT
If you are working around a sink, tile or other hard surface, please LINE IT WITH A TOWEL or FOAM RUBBER DRAWER LINER available from the grocery store.You don't want to be amazed at how easy it is to break glassware.
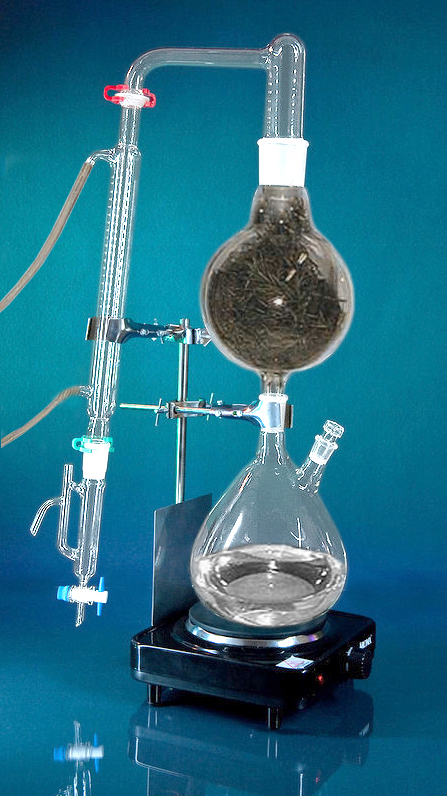
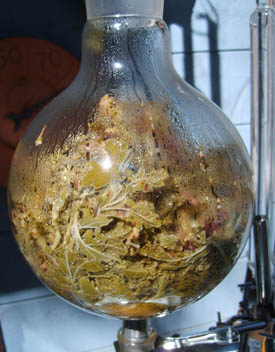
LOADING THE BIOMASS FLASK™
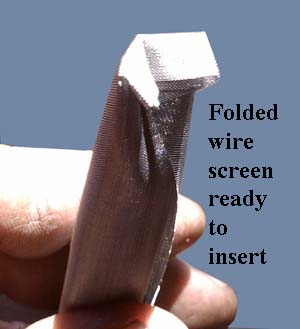
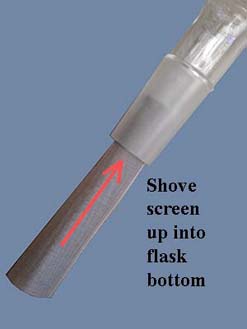
First insert the little stainless steel screen tube that we provide into the bottom of the flask, so the plant material doesn't clog the hole or fall through. Just fold it a little at the top and stick it through the bottom of the flask until it is flush with the bottom of the flasks' joint.

Now load your plant material into the bioflask™. For 2 and 5 liter bioflasks™ it is best to cut the plant material into 1 inch (max) chunks.Ę This makes it easier to both load and unload through the mouth of the flask. It's okay to use any type of plant matter in the biomass flask™ with the exception of powder or resinous chunks. Powder will clump up and cause the bottom opening to plug, and steam won't be able to get to most of it- or it may just fall into the boiling flask.Ę Resins must be hydrodistilled and simply won't work in this setup.
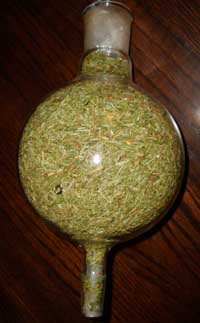
It is fine to stuff the bioflask™ full of plant material, although it will also work fine if it is partially empty (you just won't get as much oil).Ę Use a plastic or wooden dowel about 1/2" in diameter to help to pack it (the dowel is also useful for cleaning out the damp plants after distilling). DONŐT use metal or you'll break the flask!
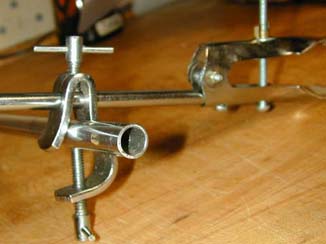
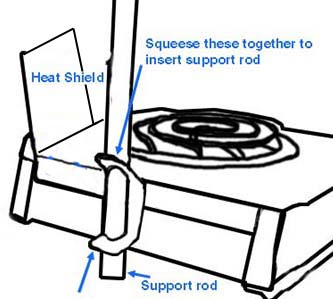
Place support rod into the clamp built into the rear of the hotplate by squeezing the top and bottom of the clamp together and inserting the rod thru the holes.
Now Assemble the two clamps to the support rod and placing them both high up on the rod. Leave the clamp screws snug but not tight.
Here's a photo of how the clamps assemble:
NOTE ABOUT THE HOTPLATES:
The hotplates do not turn all the way off when the knob is turned down all the way. This is normal.
When done, unplug the hotplate to turn it completely off! The knob will only turn the hotplate down as far as "low" but not off.
If you do not unplug the hotplate and leave the boiling flask on it, it will slowly run out of water and break the flask when the water runs out.
Putting the Glassware together
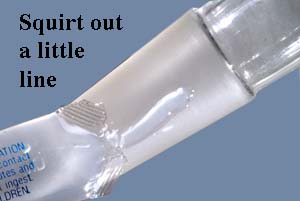
Ground glass joints will freeze together if not properly lubricated!
Three small packets of silicone joint grease compound have been provided. Before assembling any of the ground glass joints, please put a tiny dab of grease on the male end and wipe it into a line using a toothpick or your finger.
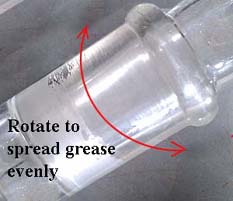
Assemble the joint, twist it gently into its socket, rotating at least one rotation to spread the grease around. If you have the right amount, the joint connection will rotate smoothly and become slightly "clear" to the eye. Too much grease- it will spin with very little friction and you'll have grease mushing out; too little and the joint will not become "clear" as you press on it and rotate it, and it will feel sticky. It actually takes very little grease to do the job. The amount in the tube may seem small, but it should last at least a month or two with daily use of the still. .
Boiling water and glass clamps
Start by filling the boiling flask about 1/2 full with water (a little more is okay but no more than 2/3 maximum). Tap water is okay, but you may prefer to use distilled or purified water so you don't get chlorine vapors steaming through your biomass™.Ę Grease the glass stopper included and plug the side port with it. Ę
Grease the biomass flask™ joints and place the biomass flask™ (pre-loaded with plant material) on top of the boiling flask, center the flasks on the burner, and secure the flasks using the upper metal clamp, attached to the top neck of the boiling flask.
NOW lightly grease both ends of the still head™ and attach it to the top of the biomass flask™. Clip the condenser to the still head™ using the provided red plastic "Keck" clamp.
Next, FILL the receiver™ (preload it) with distilled water- close the stopcock and pour in enough water to make it come out the side drain tube.

IF YOU DO NOT PRELOAD THE RECEIVER™ WITH DISTILLED WATER... This is what will happen...
As the distillation process begins and the receiver™ fills up with condensed water, the water's level will eventually rise above the bottom level of the outlet pipe. You will likely have a small quantity of essential oil floating on the surface in the receiver™ by then, and you'll notice a small "plug" of it get caught in the receiver™'s outlet pipe. This oil will be lost into the hydrosol collection flask and will not be easy to recover. If you preload the receiver™ with water before starting the distillation, this will not happen.
Using the green Keck clamp, clip the preloaded receiver™ to the condenser. You will now use the second metal clamp provided to hold the receiver™ in place to the stand/support rod. The metal heat-shield plate mounted to the hoptlate should be between the heater and the receiver™, so that heat radiating from the heater does not have a "line of sight" path to the receiver™. This keeps your distilled oil cool.
Place a drinking glass or bottle (500mL or so in capacity) under the receiver™'s side drip tip to catch the first hydrosol that comes off during distillation. It's best to position it so the drops hit the rim of the container, so they don't splash as they drip into the water... OR if you are not interested in keeping the hydrosol, you can place the whole still on the edge of your sink so the hydrosol simply drains away.
WATER FOR THE CONDENSER
The easiest way to cool your condenser is to use tap water coming in to and through the condenser, then going out of the condenser and down the drain or into your garden. Water goes IN THE BOTTOM and OUT THE TOP of the condenser. The water only needs to be a trickle, but IT MUST ALWAYS BE MOVING. Once the distillation gets underway, you will be able to tell if your flow is enough by feeling the temperature of the water coming out...if it is cold to luke warm, your flow is enough. If it's warm or hot, turn up the flow.
Chilled water is also an option- recirculating it in a bucket full of ice water with a submersible pump (optional- available from our website) conserves water over the tap/drain method BUT it requires LOTS OF ICE. If you use a pump, use a 5 gallon bucket of ice water and drop the pump in it to circulate chilled water through the condenser and back to the bucket. When using this method of cooling, plan on using at least three "grocery store" sized bags of ice, or one block of ice per distillation. Also the bucket of ice water must be at the same table height as the distiller, or the pump might not be able to provide enough flow.
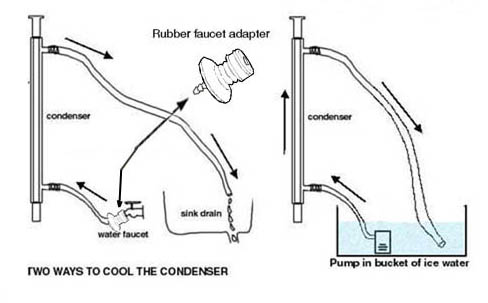
Be sure to plug the hoses onto the condensers' glass hose-bibs snugly... a hose popping off in the middle of a distillation can make a real mess! The hose may seem difficult to get on to the condenser fittings- if so, simply warm the end of the hose with hot water or over a lighter or candle flame (don't burn it!) and it will then stretch easily and slip on. (You may have to cut it off with a razor blade later, once it's on, the hose material likes to stay there!).
We've provided a rubber faucet adapter (shown in the drawing above) that may make it easier to hook the hose to most sink or garden faucets. You may have to cut the inlet hole a little bigger with a sharp knife or small scissors to get it to slip over larger faucets.
BASICALLY THAT'S IT
Turn on the condenser water, make sure the stopcock on the receiver™ is closed and it's filled with distilled water, turn the hotplate on FULL HIGH and away you go!
THE DISTILLATION PROCESS
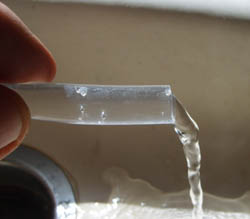
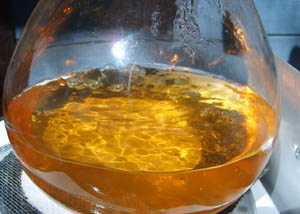
As the water heats up and starts to boil, you'll see steam starting to come out the top of the biomass flask™ into the still head™. This takes about half an hour. Eventually you'll finally see that first drip make its way down the condenser and into the receiver™. Soon you'll see a layer of oil starting to form... there it is!!
You will likely find that with many plants, the bulk of the oil comes off in the first 10-20 minutes, and the remainder takes 1-3 hours.
As the process continues, you may notice that the boiling water becomes colored- sometimes dramatically, somtimes not depending on the plant. This is due to water soluble components of the plant dripping down into the boiling flask. Don't worry, there is no oil getting down there- just colored water!
The oil will ALL end up in the receiver™, and the layer there will grow as time goes on.
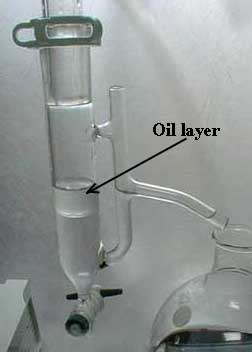
You can tell when the distillation is done primarily by noticing that the oli layer has not grown substatially in the last 30 minutes, or that the hydrosol coming out no longer smells like much.
I like to mark the oil level in the receiver™ with a sharpie line drawn directly on the glass, and then come back 30 minutes later to see if the layer has grown. If not, you're done! The plant material will also look dull and spent when the distillation is finished- but recognizing this part may take a bit of practice.
When you finally decide it's done you simply turn everything off and let it cool down, remove the receiver™, carefully drain off all the hydrosol left in the receiver™ by slowly opening the stopcock, and when the water is gone and the oil layer has just barely hit the bottom, quickly close the stopcock.
I personally like to clamp the receiver™ to the support rod and let it hang there for an hour or so, to allow any oil stuck on the inside to make it's way down and join the big puddle, especially if the plant is not a big oil producer. If there's lots of oil, that step is unnecessary. Either way, I finally open the stopcock and carefully drain the oil into a clean bottle.
HINTS
If you wrap your bioflask™ with a bath towel held in place by clothespins, it will insulate the flask somewhat and this will help keep it at steam temperature. The result will be less steam condensing in the bioflask™ and returning to the boiling pot as water, which means more of the steam will get through the bioflask™ and into the condenser. Your distillation will go faster and you'll create more hydrosol. It's an option with the 2 liter flask, a good idea with a 5 liter, and mandatory on a 10 liter system.
Please be sure to keep the towel away from the hot part of the electric burner- I've caught mine on fire more than once by not paying attention!!!. Also be sure you have adequate indoor ventilation or do your distilling outside.Ę Oils are potent!
BURNED SMELL?
Note: You may notice that when you're finished, your oil and/or hydrosol smells like it's a bit "burned". This is a natural occurance with any steam distillation system and it's not actually "burn" that you're smelling- it's stinky phenols and/or related compounds from the plant that have been distilled along with the oil. By simply leaving the oil and hydrosol bottles uncapped and open to air for a time ranging from a day to a week depending on the oil, this stinky note will disappear. Smell the oil daily and when one day it smells "yummy", it's time to cap it up for use or storage.
Brown glass bottles are best to use for storage because they keep light out, and refrigeration at this point will make your oils last longer.
CLEANING
I usually just swirl a lot of soapy water around in the parts, and use a bristle brush to clean everything. It's all pyrex, so it can also be put in a dishwasher. It's a good idea to first wipe as much of the joint grease out as you can with a paper towel or tissue. My wife will sometimes rinse the parts first with a swirl of vodka to dissolve and remove any oils from the flasks and parts prior to washing them with soapy water.Ę Rinse very well to remove all the soap residues. BE CAREFUL to not clunk the glass against the sink... those plastic liners are nice for safety... most glassware is broken during cleaning! If the flasks bump into a hard object they may develop little tiny "star" cracks. These are dangerous- they can be repaired, but if left unattended, they can easily cause a flask to crack or break apart at the most inconvenient time, like when it's full of boiling water...BE CAREFUL WITH THE GLASSWARE!!
I've found that using a 3/8" diameter dowel or plastic rod is helpful for quickly poking plant matter and stems out of the biomass flask™. Don't be tempted to use metal or you'll break your flask. Shaking the bioflask™ over a plastic trashcan also works well to remove the bulk of the plant material.
Guck in the boiling flask that builds up from the mineral deposits of your tap water can quickly be removed with an overnight soak in vinegar, or if you're in a hurry, a swirl of muriatic acid (pool acid) or dilute hydrochloric acid. I haven't tried it but a good soak with Lime-away will probably work just as well. BE CAREFUL with these chemicals; they are dangerous. If using anything other than vinegar, use safety glasses and good rubber golves!! Be sure to rinse everything very well before your next distillation.
I usually do not remove the water hoses from the condenser- I've found that for the most part, simply pouring a little soapy water inside the center tube, plugging the ends with my fingers, and giving it a good shake is enough to clean the inner condenser tube, but the water jacket should never need cleaning. It's a lot easier to just leave the hoses on for storage than risk breaking things trying to get them off each time you use the system. If you do have to remove them and they are stubborn, use a sharp knife and slit the hose at its base, and it will come off easily. The only problem with doing this is that your hoses magically get shorter and shorter....
Many people find it very helpful to make notes after each distillation so they can repeat great results.Ę Time of year, variety of plant, and stage of the plant's growth cycle can all make a huge difference in yield.
OPTIONAL ACCESSORIES
Click Here to learn about other things you can do with this kit, and other optional accessories availiable.
BOILING and SOLVENTS
Not that you need this information, but in case you have any questions about boiling and what it actually is, why you are supposed to use boiling chips with solvents other than water, or perhaps you want to know the boiling temperatures of many common solvents,
CLICK HERE